Contact Details
Website: techextension.com Store :store.techextension.com
Email: support@techextension.com Skype: tech.extension
Product Page: Sugarcrm Asterisk Integration
Supported CRM Version
SugarCRM Community Edition (CE) , SugarCRM Pro, SugarCRM Corporate, SugarCRM Ultimate, SugarCRM On Demand, SugarCRM Open Cloud (European On Demand)
SugarCRM Versions:
6.1.x 6.4.x 6.5.x 6.6.x 6.7.x 7.x 8.x 9.x
Supported IP PBX / Call Center Server
Asterisk, Elastix, FreePBX, PBX in a Flash, Vicidial, Asterisknow, Yeastar PBX, Xorcom, Asterisk pbx, Fonality, Trixbox , Other Asterisk Based Telephonic Server
Prerequisite
- JRE 1.7 or higher version should be installed on PBX Server.
- Require CDR Event should be enable for Asterisk Server.
- Require port 9999 and 5038 should be enable for Asterisk Server.
- Supports Asterisk, Elastix, FreePBX, vicidial, PBX in a Flash, asterisknow, xorcom, asterisk pbx, fonality, trixbox or Asterisk Based Telephonic Server.
- Support Soft phone or Sip based hard Phone.
- There should be connectivity between CRM and Asterisk server.
- Please make back up of data of crm and asterisk and also crm folder before Installation.
Installation Steps
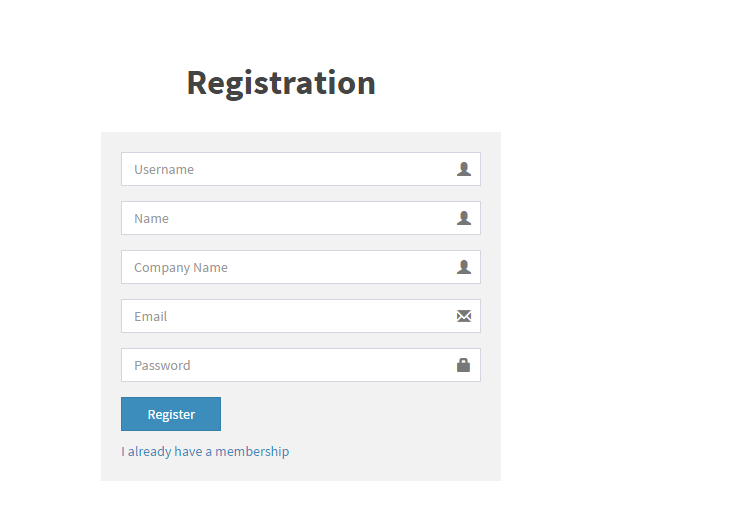
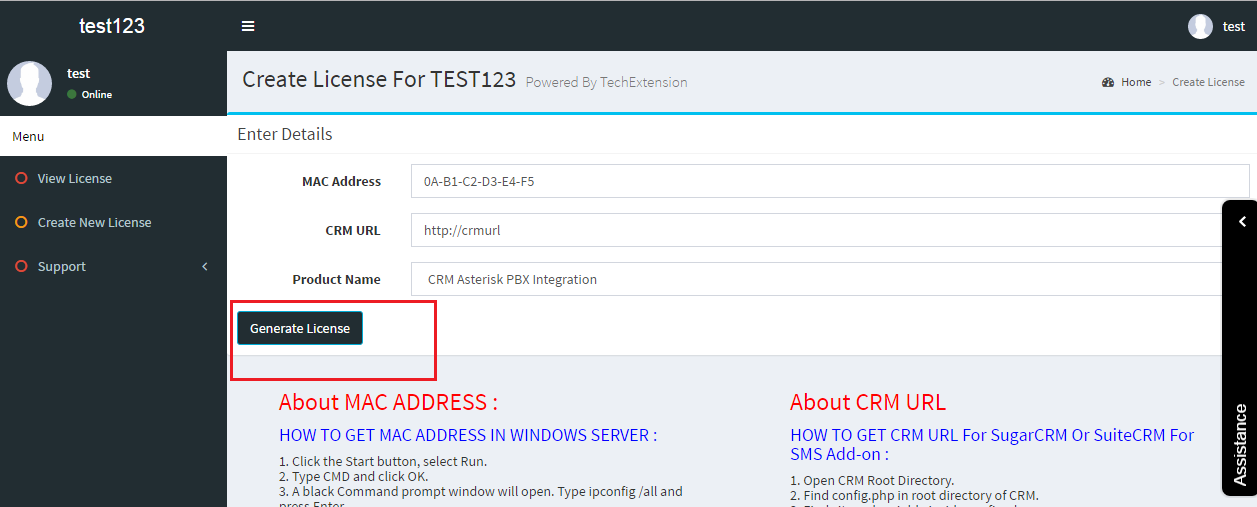
Create Account On Our Portal https://license.techextension.com/register.php
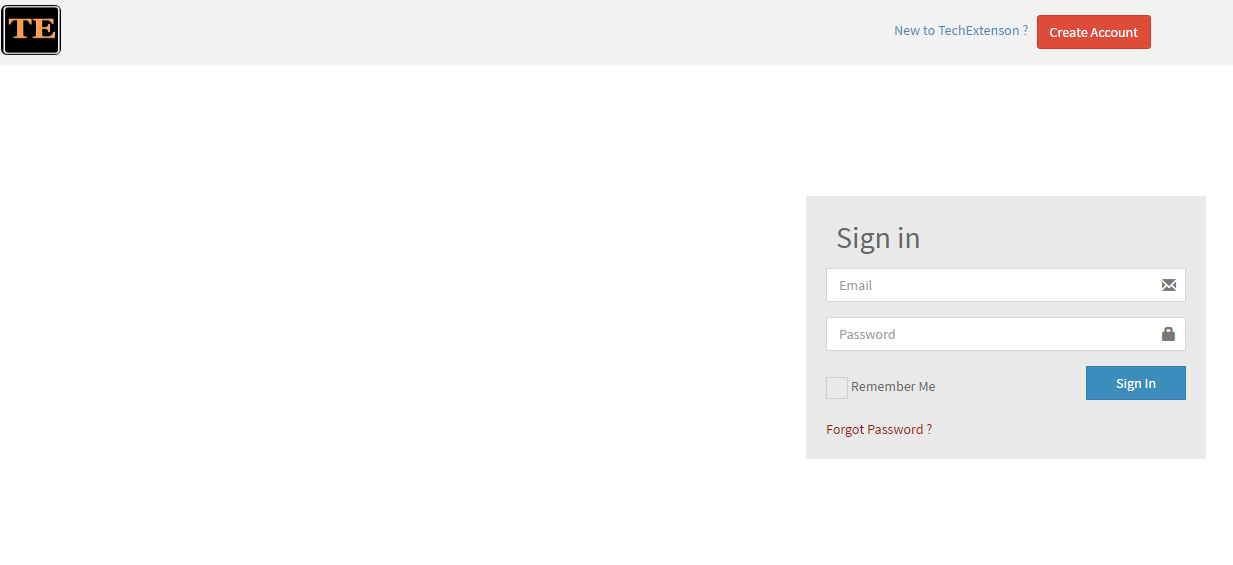
Log In after Creating account https://license.techextension.com/login.php
Add License
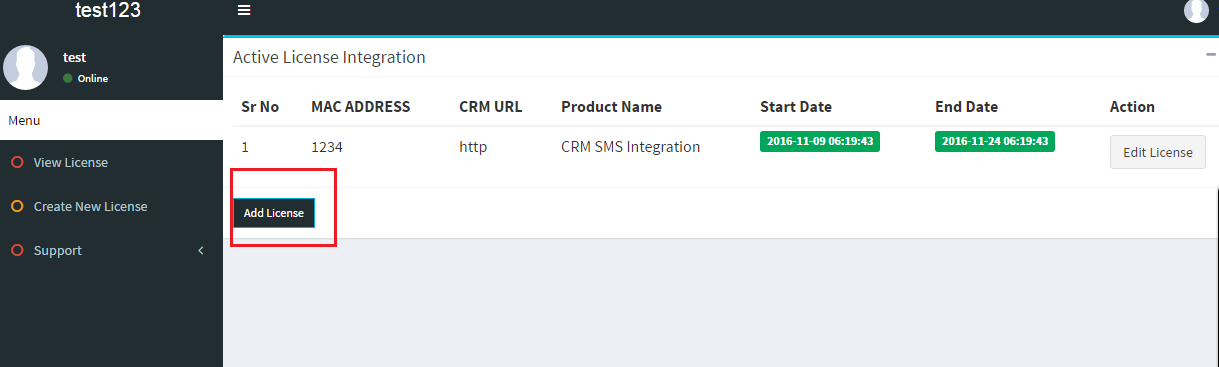
Generate License
Download module SugarCRM Version 6.X SugarCRM Version 6.X Download
Download SuiteCRM module SuiteCRM Download
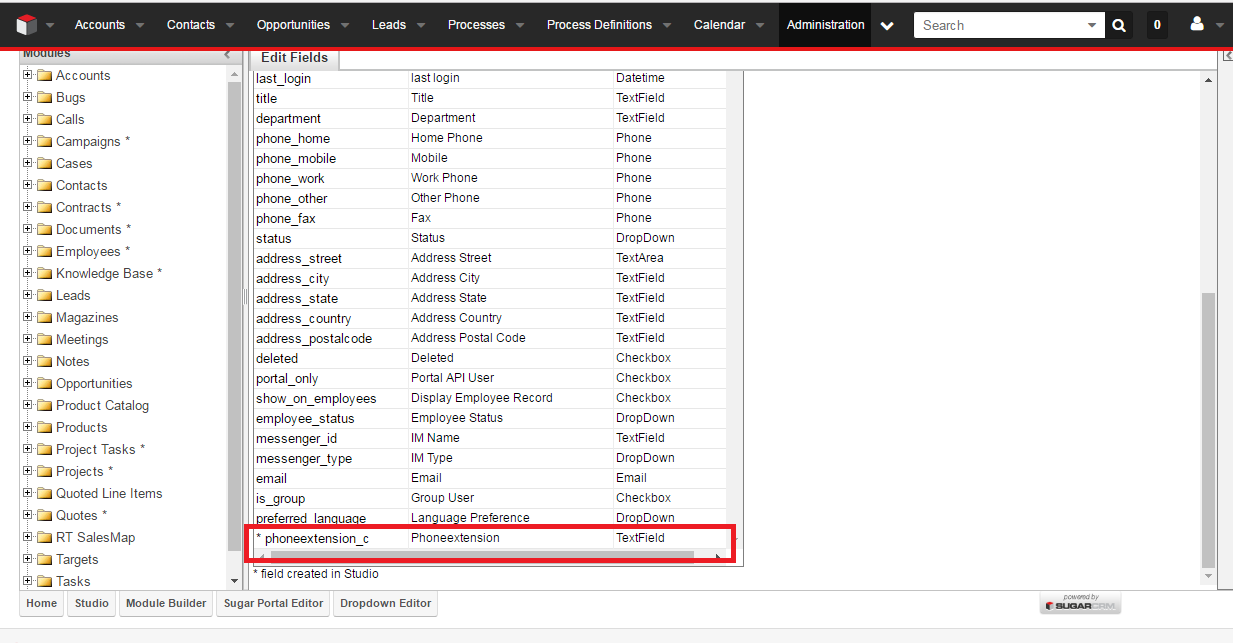
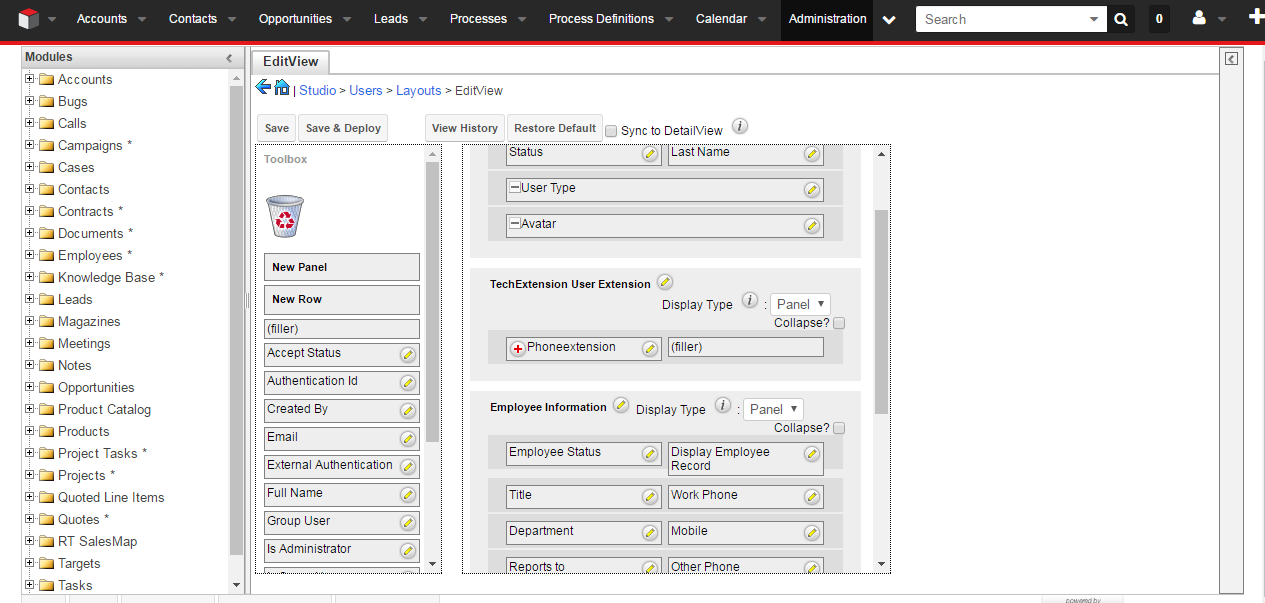
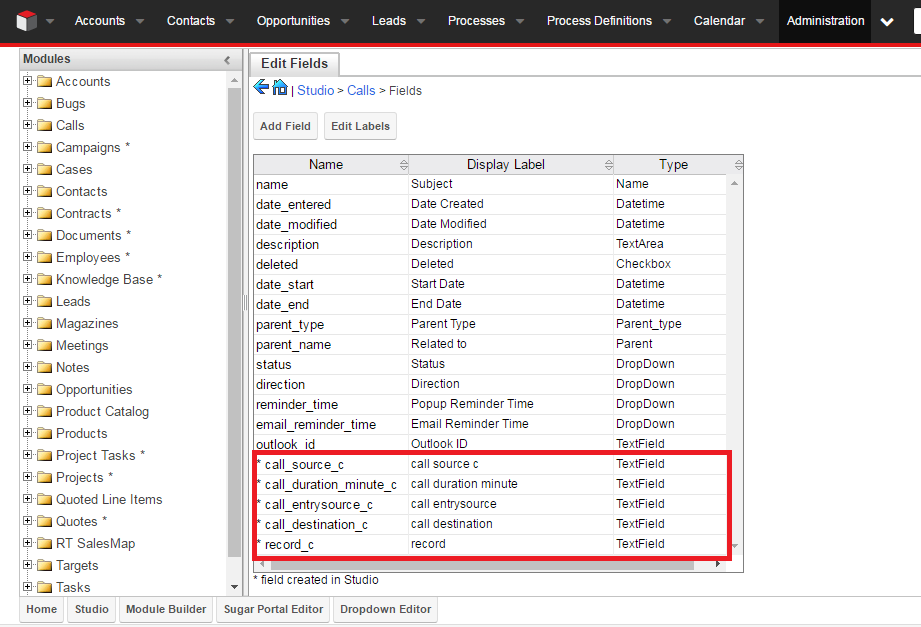
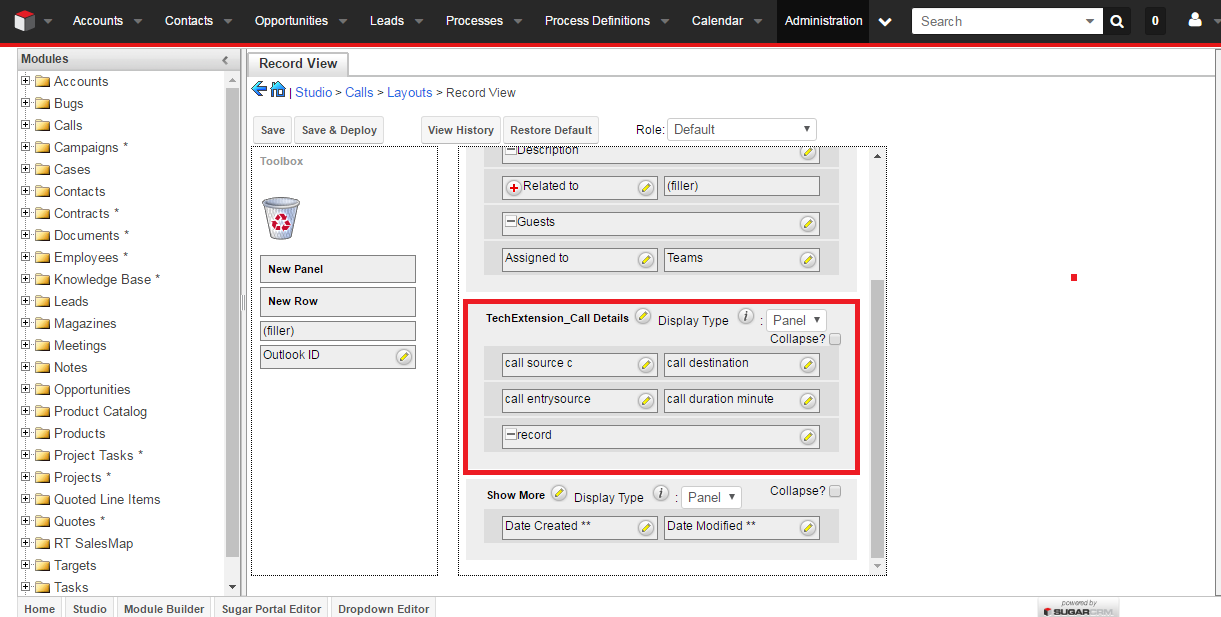
NOTE : For SugarCRM Version 7.X and 8.x Admin need to create fields Manually From studio
User module
Data Type:TextField
phoneextension_c
Call Module
Data Type:TextField
Field Name:call_source_c
Data Type:TextField
Field Name:call_duration_minute_c
Data Type:TextField
Field Name:call_entrysource_c
Data Type:URL
Field Name:record_c
Data Type:TextField
Field Name:call_destination_c
1. How to Install Using Module Loader
After receiving the file that you would like to install, you must first upload it to your Sugar instance. To upload a file, follow the following steps:
Step 1: Go to Admin Panel

Step 2: Navigate to Admin > Module Loader
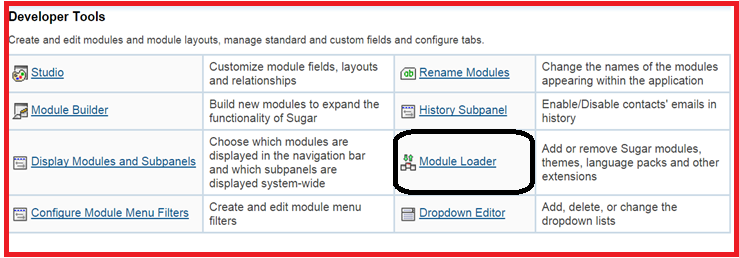
Step 3: Click the "Choose File" button in the Module Upload panel to open a file selection window from your browser.

Step 4: Select the file from your local computer.
Step 5: After you select your file, click the "Upload" button to complete the process

Step 6: After it has been uploaded, the package will show in the Uploaded Packages panel

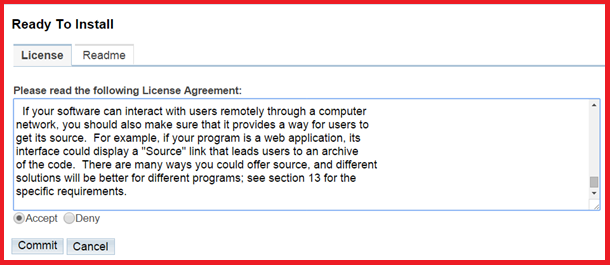
Step 7: You will be brought to the installation screen to confirm that the packages should be installed, and to read and accept any license or read me documentation as needed. Click "Commit" when ready to run the installation.
Step 8: The next page will show a progress bar and a completion notice. If there are any errors, they will be displayed with a verbose explanation of what went wrong. If not, click "Display Log" to show what happened during the installation process.
Step 9: Click Back to Module Loader when complete to return to Module Loader. If you do not need to install any further packages, you can navigate to any other section of Sugar as need be.
2. Admin User Configuration
Download techextension.zip File For SugarCRM 7 and Above Version
Download techextension.zip File For SugarCRM 6.X, SugarCRM CE and SuiteCRM All Version
Upload techextension.zip on public web folder on server and extract it ( Example : /var/www/html/techextension So web URL Like http://192.168.1.100/techextension ) than follow the steps
After Successfully Activation of Module, you need to Admin User setting Module. Following steps describe Admin User Configuration process.
Step 1: Go to http://IP/techextension/AsteriskSupport/
Step 2 :Fill sign up form with login name and desire password
Step 3 Login in ( http://IP/techextension/AsteriskSupport/)
Step 4 Do Configuration
Step 5 Enter Your Asterisk Server Details By Step By Steps
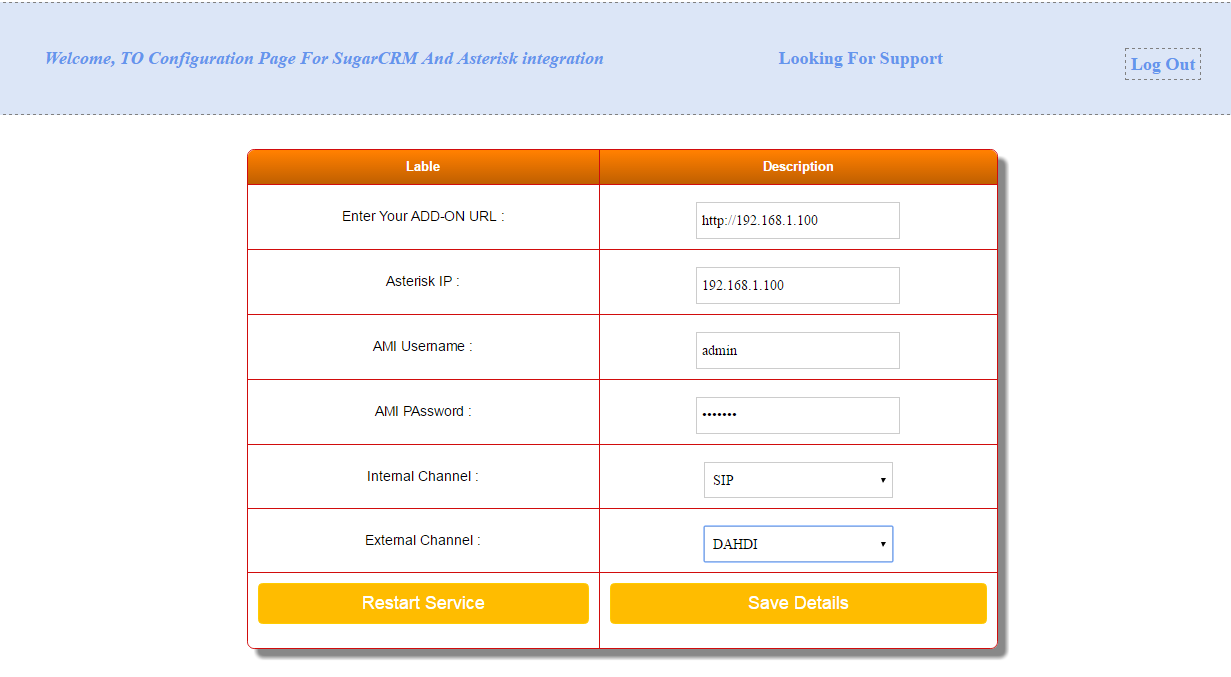
Asterisk IP ( 192.168.1.3)
UserName : Asterisk server Admin Manager User Name
Password : Asterisk server Admin Manager Password
Internal Channel: SIP
External Channel: DAHDI
You will find Asterisk server Admin Manager User Name and password from /etc/asterisk/manager.conf
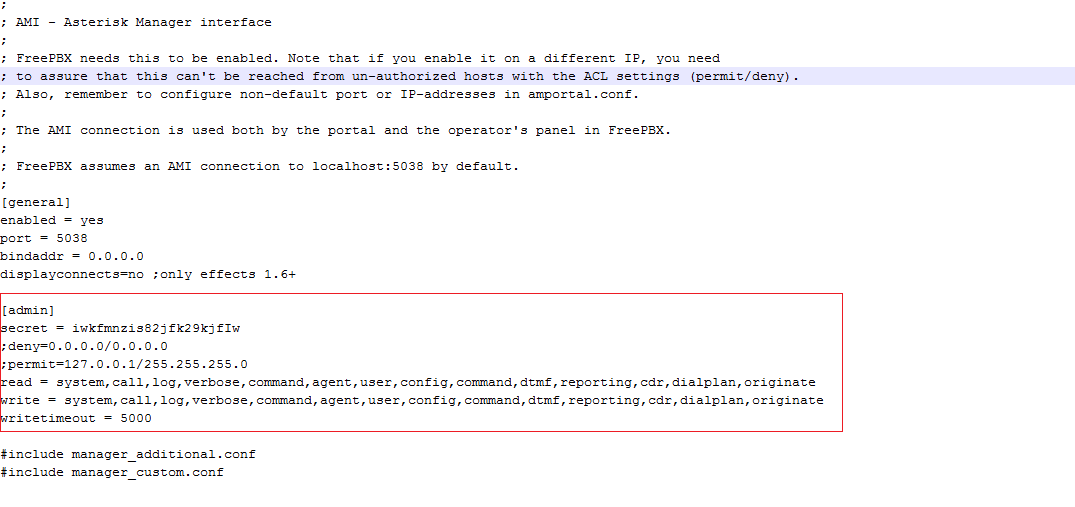
Make sure that your CRM server IP have access to your asterisk pbx server AMI. Check permit and deny setting in manager.conf
After changes in file Restart Asterisk PBX. ( command : /etc/init.d/asterisk restart )
Steps 6 Please Save the Configuration and create Following Panel

Now Access server using Putty or other ssh client and Go to techextension Folder .
(cd /techextension/AsteriskSupport/ )
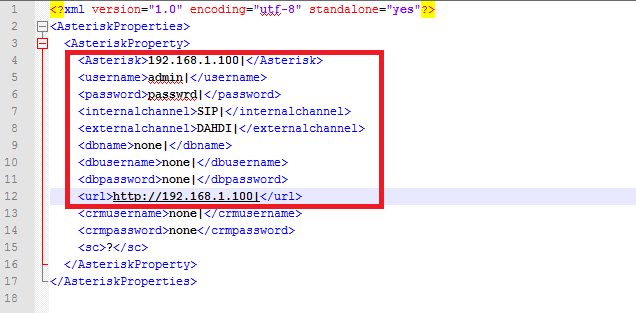
Edit This File AsteriskProperties.xml
< url>http://techextensionurl|< /url>
Here http://techextensionurl is same as your add-on URL If you have URL like http://192.168.1.100/techextension than URL should be http://192.168.1.100
Note : Do not remove | from ends its is used for our purpose.

Now Check Once again all setting .
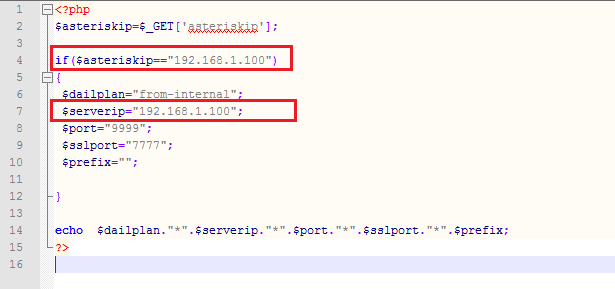
Now Open configuration.php .
Enter same IP of Asterisk ( $asteriskip) entered in AsteriskProperties.xml
Enter same IP of Server ($serverip) which is techextension folder server IP
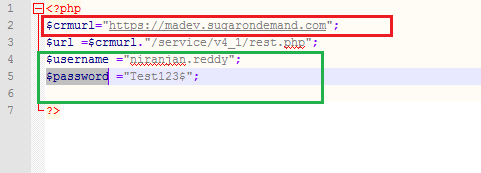
Now Open crmconfig.php .
Enter ( $crmurl, $username, $password) .
Here $crmurl is CRM URL
Here $username is admin Username of CRM
Here $password is admin password
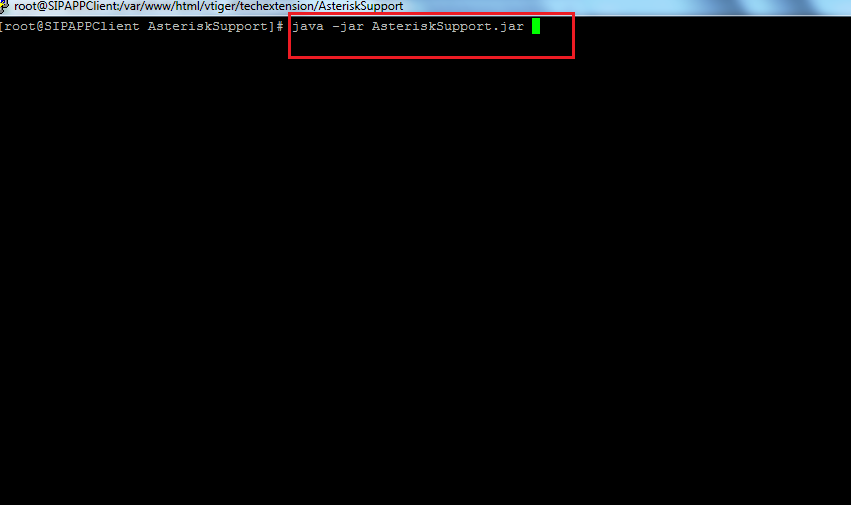
Now Run This Command in putty .
java -jar AsteriskSupport.jar
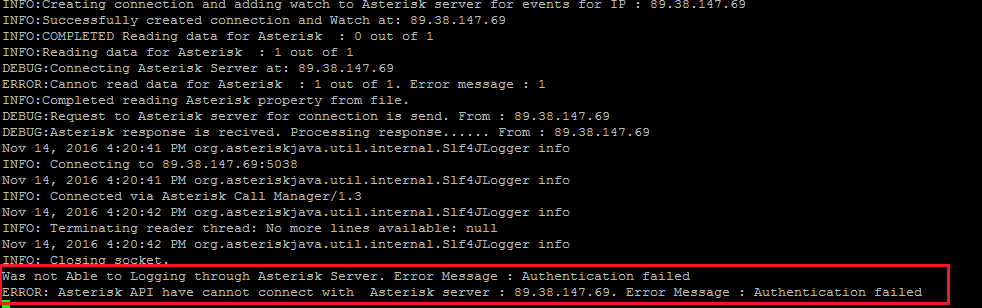
If you get Following message. Check AMI ( Asterisk Manger interface ) User name and Password set on previous above steps
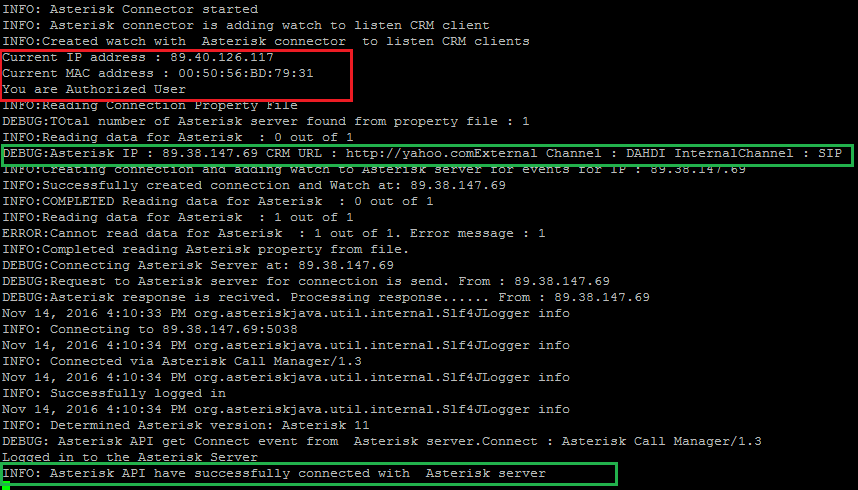
If you get Following message. It is Successfully Integrated
Download Voip File
Extract voip.zip file
Now Run This Command in putty .
pwd
It will Give you path

Put It in to voip file
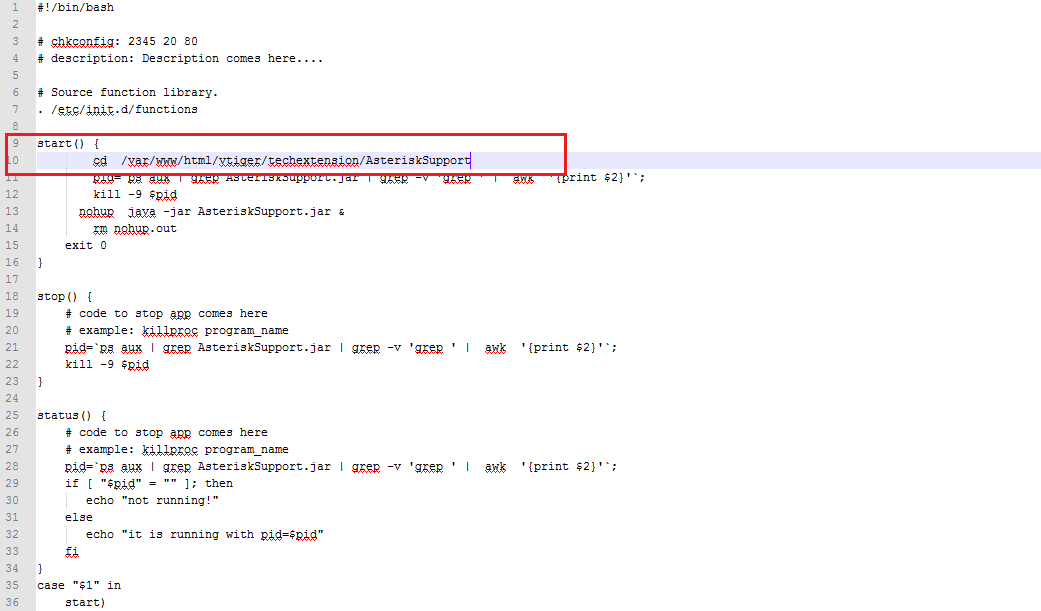
Upload voip file in to /etc/init.d/
Give voip file permission to 755
Run This Command if you have CentOS ( chkconfig voip on && chkconfig --list )
Run This Command if you have Debain OS ( update-rc.d voip defaults )
Techextension add-on command
check status: ( service voip status )
Restart : ( service voip restart )
stop: ( service voip stop )
Start : ( service voip start )
3. End User CRM Configuration
After Successfully Admin User Configuration of Module, you need to End User setting Module. Following steps describe End User Configuration process.
Step 1 : Go to User Panel
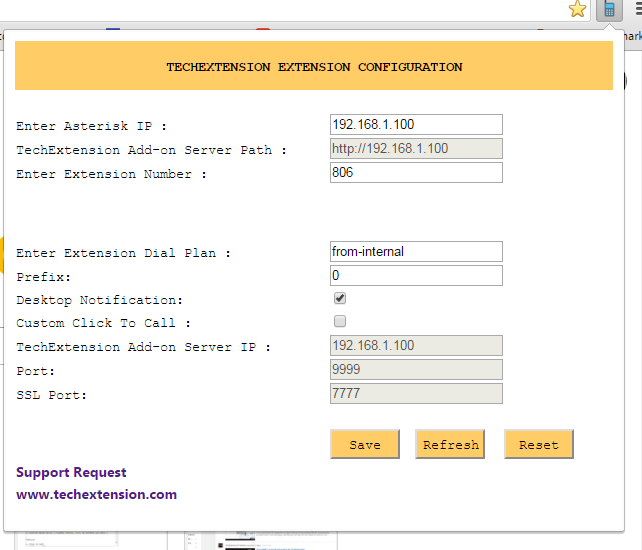
Step 2 : Fill appropriate Details as shown here
sugarcrm Asterisk Integration Add-on User Configuration.
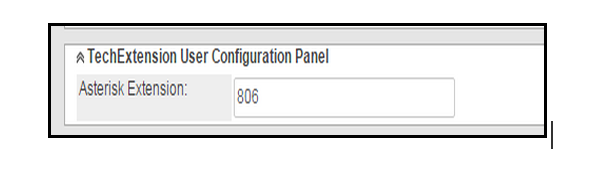
Step: 3 Save the User profile
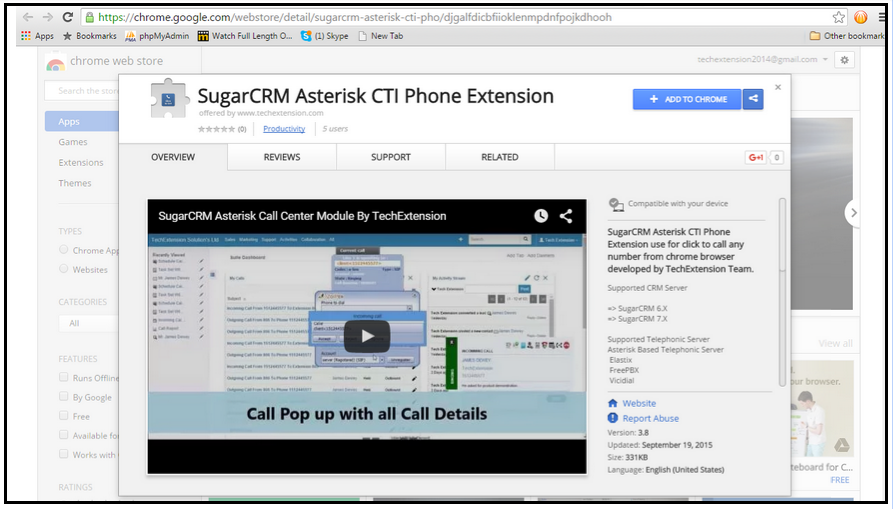
5. End User Chrome Extension Configuration
Go to chrome web store
Configure Chrome Extension
Click on Phone Icon It will open following Set up window .
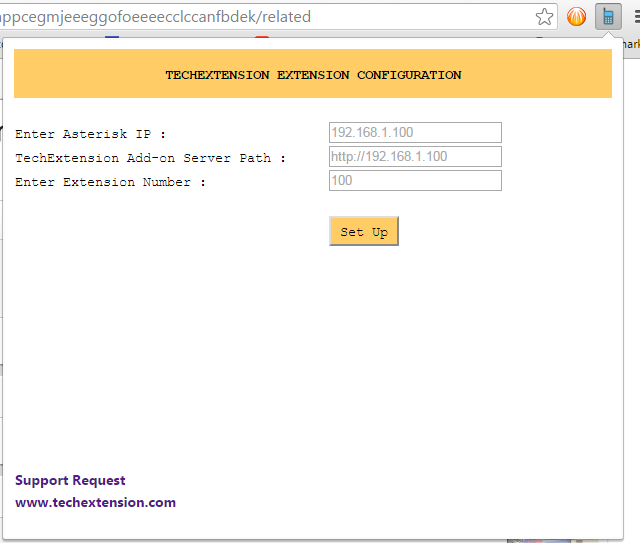
Fill Informatin and Click on Set-up. It will open following window.
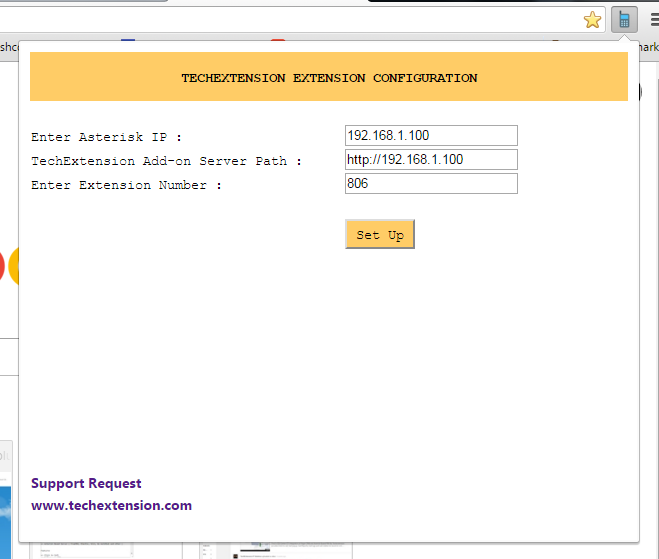
User need to fill following details and save configuration. .